Ultimate Guide to Dehydrated Backpacking Meals
JUMP TO: BENEFITS | DEHYDRATED VS FREEZE DRIED | BEST DEHYDRATORS | “HOW TO” GUIDE | FAVOURITE RECIPES | SUMMARY
Author: Sam Brilleman | Updated: Oct 10, 2023
We may earn a commission when you buy through our links. Learn more.
The perfect backpacking food finds a balance between weight, convenience, nutritional value, and calorie density.
To satisfy some of these criteria many hikers will reach for lightweight, heavily processed, calorie dense foods, void of both taste and nutritional value. Common examples are freeze dried backpacking meals, instant potato mash, prepackaged pasta meals, and ramen.
However, homemade dehydrated backpacking meals provide a much more appealing alternative, since they are still lightweight and calorie dense but also are nutritious and taste good.
That’s right… you can have it all!
BENEFITS OF DEHYDRATED BACKPACKING MEALS
Homemade dehydrated backpacking meals have a large number of benefits, including:
they are nutritious — although some nutritional value is lost in the dehydrating process, much is retained. So if you dehydrate healthy home-cooked meals, then your backpacking diet will only be a little less nutritious than your diet at home!
they are lightweight and calorie dense — dehydrated foods have a much higher calorie-per-ounce ratio than equivalent fresh foods. Although dehydrated foods are slightly heavier than freeze dried foods, they are not too far behind. Dehydrating at home removes around 70-80% of water content from the food, while commercial freeze drying removes around 98-99% of the water content.
they are inexpensive — because you can make them at home, dehydrated backpacking meals are much cheaper than commercially sold freeze dried backpacking meals.
they pack down small — because the water content is removed, dehydrated foods take up far less volume than their hydrated counterparts. Dehydrating usually reduces the volume of food to about 10-30% of its original volume. This makes them ideal for backpacking.
they aren’t creepy — you know exactly which ingredients went into a homemade dehydrated meal, since you made it yourself! So you can ensure there aren’t any of the weird, unrecognisable, lab-science-sounding nasties commonly found in packaged freeze dried backpacking meals. Many people complain that processed freeze dried backpacking meals give them discomfort or an upset stomach. The same isn’t true for homemade dehydrated backpacking meals.
you can pack the correct quantities — since you prepare the meals yourself at home, you can decide how much you want to eat / carry. Many packaged freeze dried backpacking meals come in “serves”. But often the serving sizes are ridiculous — one serve per person isn’t enough, yet two serves per person is too much (both in cost and quantity).
they taste good! — since you can design the recipes yourself, they can be dialled in to match your tastes. This is the best part for us, because meals that taste this good bring a reminder of the comforts of home. This means a moral boost every night while out on the trail!
DEHYDRATED VS FREEZE DRIED
Dehydrated and freeze dried both refer to processes by which the water content in food is removed. Since bacteria, moulds, and yeasts require water to grow and flourish, removing the water content means that the food will no longer be able to spoil. The more water that is removed, the longer the food will be preserved.
Although many people use the terms dehydrated and freeze dried interchangeably, they are actually two quite different things.
DEHYDRATION
Dehydration is the process by which a low heat (usually in the range of 95 to 140ºF, or 35 to 60ºC) is used to dry food. The temperature is intended to be high enough so that the water content in the food will evaporate, but low enough so that the food does not cook.
The process does not require sophisticated techniques or equipment. For instance, food dehydration can even be achieved by simply sun drying or wind drying the food. In fact, dehydration was used for food preservation by ancient civilisations, reportedly as long ago as 12,000 BC!
Simple methods of dehydrating can work, but an electric food dehydrator makes things way easier.
However, traditional methods of food dehydration require appropriate conditions (i.e. warm temperatures, direct sun, and dry air) or the food might spoil before the water content is removed.
Therefore the modern approach is to use an electric food dehydrator.
An electric food dehydrator is basically a stack of plastic trays with a lid on top, with small holes in the trays to allow ventilation, and then something resembling a hairdryer blowing warm air into the base of the chamber. This allows more accurate control of temperature compared with sun drying, and therefore a more efficient drying process.
Because the technology is relatively simple, electric food dehydrators retail for relatively cheap — usually in the range of US $35 to $150 depending on size (i.e. number of trays), quality, and features.
Our electric dehydrator — it’s simple to use and was inexpensive to purchase.
Note: It is worth noting that a conventional household oven can also be used for dehydrating. However, we recommend an electric food dehydrator because it makes things a lot simpler. With an electric food dehydrator, it is much easier to arrange the food in thin layers, allow air circulation, and control low temperatures (to avoid cooking).
FREEZE DRYING
Freeze drying has a much shorter history than dehydrating. The oldest reports of freeze drying come from around the 13th century, when the Andes mountains were used to freeze dry potatoes. However, freeze drying wasn’t popularised — at least not commercially or around the world — until the 1900’s, and in particular during World War II. In World War II freeze drying was used to preserve blood, medicines, and food so that it could be transported long distances.
Freeze drying is the process by which food is frozen, then placed in a vacuum, and then the temperature is slowly raised. This causes the water content in the food to first solidify (i.e. become ice) and then to transform directly from a solid to a gas.
For those of us who aren’t chemists or lab scientists, this process can seem a bit confusing at first. I mean, like…
How the f**k can water go straight from a solid to a gas?
But that is because we generally observe the behaviour of water at standard atmospheric pressures. At “sea-level” air pressure…
water freezes at 0ºC (i.e. goes solid)
water boils at 100ºC (i.e. starts evaporating)
and water is a liquid at temperatures between 0ºC and 100ºC.
But at low atmospheric pressures — for example at the top of Mount Everest! — everything gets a bit skewed. As the air pressure drops, water begins to boil at temperatures below 100ºC. Yep, that’s some strange and spooky shit. I mean…
Imagine being able to put your hand directly into a pot of boiling water and not suffering any injury. Well, if you climb Mount Everest you can have the joy of doing just that.
Even stranger is that at extremely low air pressures — or in a vacuum — liquid water doesn’t even exist!
Instead, water changes directly from a solid state (i.e. ice) into a gaseous state (i.e. water vapour) or vice-versa. This process of going directly from a solid state to a gas is known as sublimation and it is the magic by which the freeze drying process operates.
the state of water at different temperatures and pressures — sublimation starts to occur at pressures below the so-called “triple point”.
Because the complexities involved with the process — for example, freezing temperatures and atmospheric pressure control — the freeze drying of foods can generally only be carried out commercially.
Although, recently it did become possible to buy a freeze dryer unit for home use. However the current price, size, and noise of the units makes freeze drying at home pretty unrealistic.
The Harvest Right Home Freeze Dryer — it’s big, heavy, loud, complex, and f**king expensive.
The fact that freeze dried foods are only produced commercially means they can get quite expensive. Freeze dried backpacking meals usually retail for about US $7-12. For a longer backpacking trip that price tag can begin to add up.
On the other hand dehydrated backpacking meals can be prepared at home, thereby making them far more cost effective for both short and long backpacking trips.
WATER CONTENT & FOOD PRESERVATION
Most “home style” electric food dehydrators reportedly remove about 70-80% of the water content from food. However, commercial food dehydrators can be slightly more efficient reportedly removing up to 90-95% of the water content.
In contrast freeze drying removes more water content than dehydrating, usually in the range of 98-99%.
This means that freeze dried foods will last for years before they spoil, whereas dehydrated foods might be good for 6 months to a couple of years depending on the food type, water content, etc.
Of course if you are dehydrating your backpacking meals in the weeks or months leading up to your trip then these time frames should be more than sufficient — dehydrated foods will easily last until you head out on your hike!
NUTRITION RETENTION & FOOD STRUCTURE
In theory the nutritional content retained in freeze dried foods is slightly higher than dehydrated foods due to the lack of heat applied during the process.
However there is a flip-side to that. Because freeze dried backpacking meals are produced commercially, they are generally loaded up with sodium (salt) and all kinds of strange ingredients.
On the other hand, dehydrated backpacking meals can be prepared at home — meaning they only contain the ingredients you choose to add to them! We believe this makes dehydrated backpacking meals the healthier and tastier alternative.
THE 3 BEST DEHYDRATORS
Dehydrators generally come in one of two designs: a shelf design or a stacked design.
A shelf design — like the Excalibur 3926T — provides a more even drying process since the fan is at the back of the unit blowing across the trays. However a dehydrator with a shelf design cannot be expanded. That is, the number of trays and the drying space available cannot be changed. So if you buy a shelf dehydrator you should make sure that it will have adequate space for all your needs in the future.
A stacked design — like the Nesco Gardenmaster Digital Pro — provides a less even drying process because the fan is at the top or bottom of the unit and therefore closer to some of the trays than others. This means that you may need to rotate the trays during the drying process (which is pretty darn easy to be honest). However the advantage of a stacked design is that it is expandable. That is, the number of trays can be increased or decreased. If you want more drying space in the future then you can simply purchase additional trays.
Best Overall: Excalibur 3926T
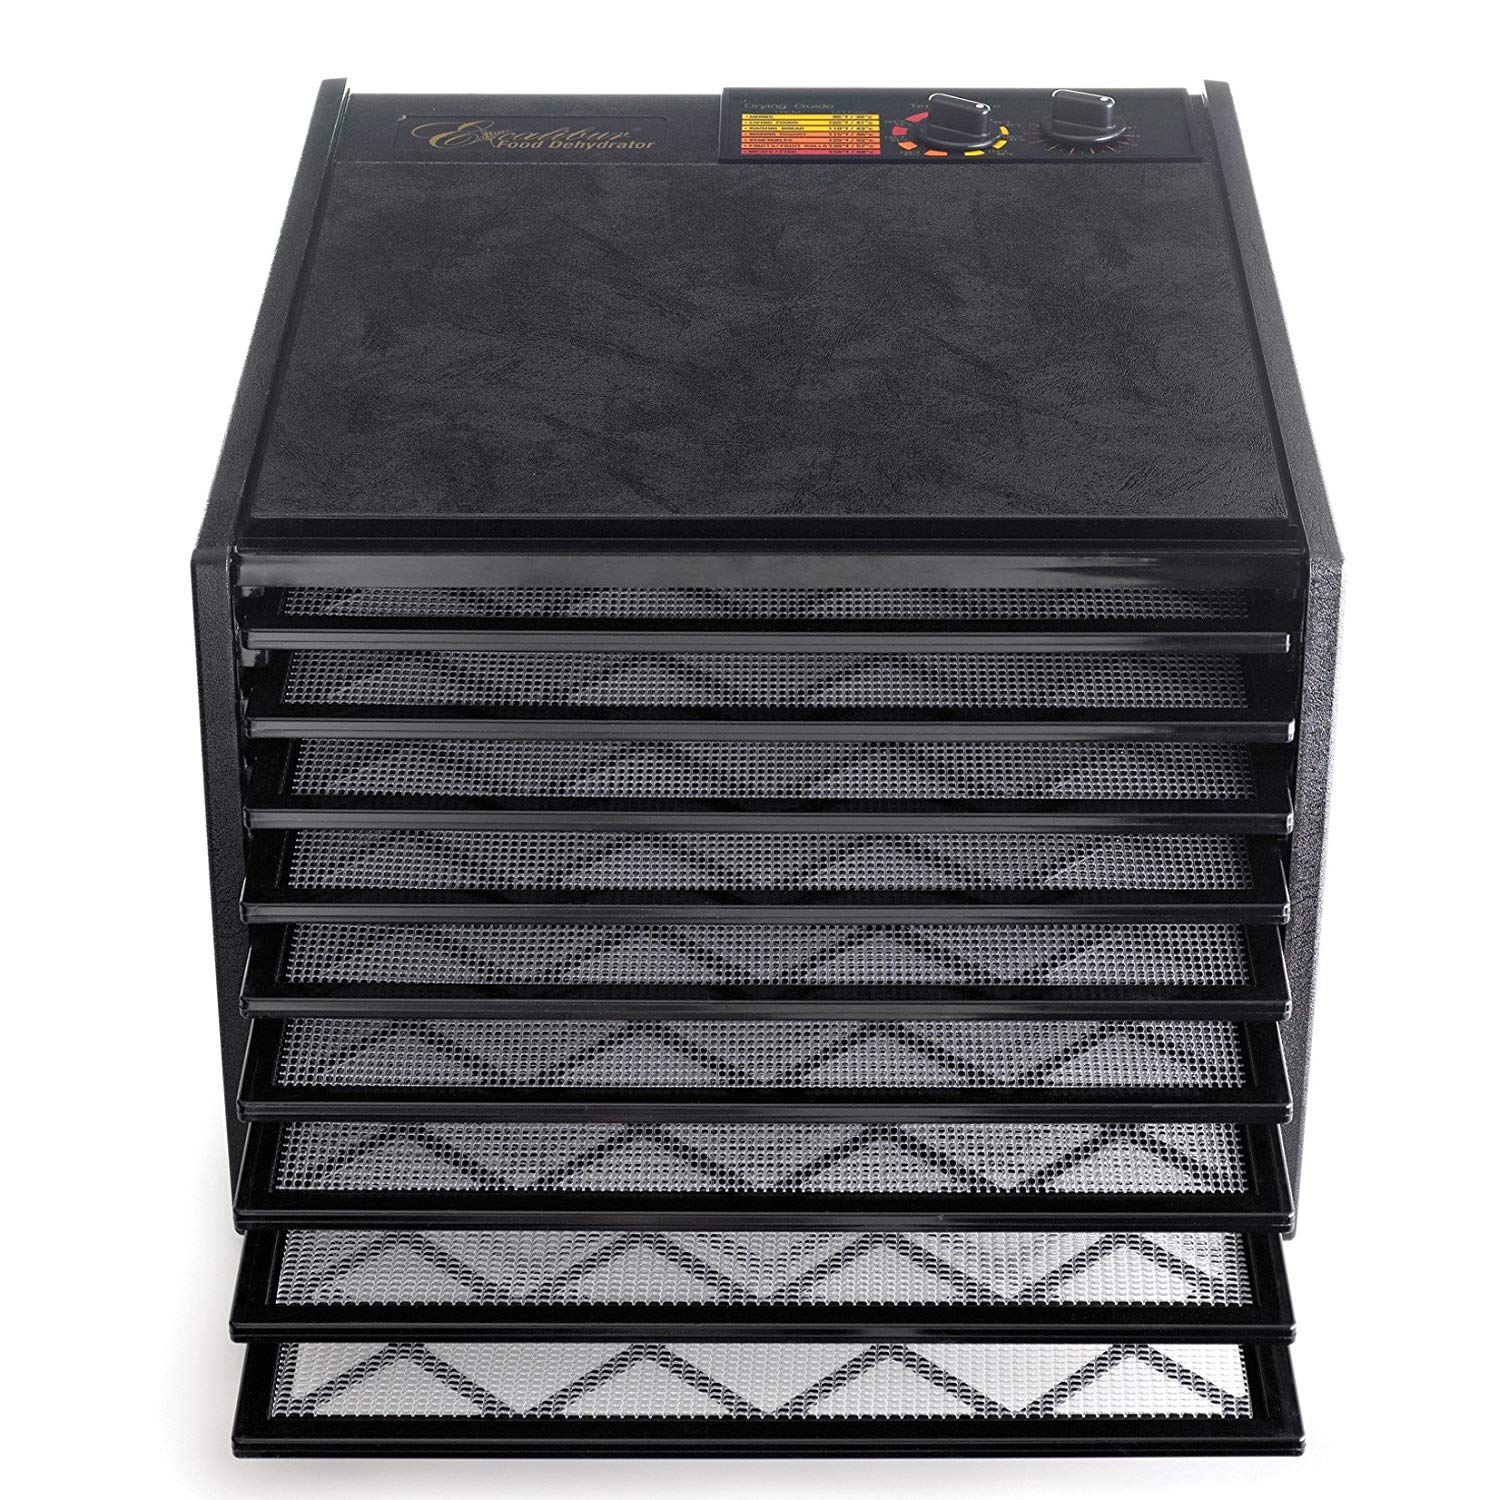
CAPACITY: 15 square feet (9 trays)
EXPANDABLE: No
SHUT-OFF TIMER: Yes
ADD ONS: Sheets for drying liquids
BEST FOR: Those who want the best quality
PRICE: $$$$
Excalibur have been in the dehydrator business for almost 50 years, so they sure know their stuff. Their products are still manufactured in the USA and are some of the highest quality dehydrators on the market. In fact, Excalibur are so sure of the quality of their dehydrators that offer a 10 year warranty.
Their design uses square trays and a rear 7” fan that is intended to provide a more even drying process across all the trays. This means you won’t need to rotate the trays during the drying process, like you might have to with some stacked dehydrators.
The “26T” in the model name refers to the 26-hour timer on this unit. An automatic timer is handy and 26 hours is sufficiently long enough for dehydrating most backpacking foods. You might see a “B” or “W” on the end of the model code — this just refers to the color of the unit, either black or white.
The downside? It is expensive.
Runner Up: Nesco FD-1040 Gardenmaster Digital Pro
INCLUDED CAPACITY: Approx. 5 square feet (5 trays)
EXPANDABLE: Yes, maximum 20 trays
SHUT-OFF TIMER: Yes
ADD ONS: Sheets for drying liquids, Sheets for drying small items, Additional trays
BEST FOR: Those who might want to dehydrate large quantities in the future
PRICE: $$$
Nesco dehydrators might not come with the same stamp of quality as Excalibur dehydrators, but they do come with a lower price tag.
The Gardenmaster Digital Pro is the high end offering from Nesco. It comes with a 1000 watt motor that is powerful enough to make this unit expandable up to 20 trays! But note that if you want that kind of capacity then you will have to purchase the additional trays separately — the unit only comes with 5 trays included.
The Gardenmaster uses Nesco’s patented Converga-Flow design. The design uses a top mounted fan to push warm air down the walls of the unit and then horizontally across the trays. This may just sound like manufacturer hype, but it is actually surprisingly effective. The design results in a more even drying process compared to most other stacked dehydrators. It is also means that you don’t usually need to rotate the trays in the middle of the drying process.
Another marketed benefit of a top mounted fan (as opposed to a bottom mounted fan) is that liquids can’t drip down into the fan and motor. However we have not encountered any issues with bottom mounted fans anyway — just make sure you use parchment paper or some kind of lining when dehydrating foods with a high liquid content (see our “how to” guide below).
The Gardenmaster has a digital timer, so you can set and forget. The warranty on the Gardenmaster is one year, providing some indication that the quality of this unit isn’t quite in the same ballpark as the Excalibur (which comes with a 10 year warranty!). Nonetheless the Nesco Gardenmaster Digital Pro is still a great unit worth considering if want the flexibility to dehydrate larger quantities when needed.
Best Buy: Nesco FD-75 Snackmaster Pro
INCLUDED CAPACITY: Approx. 4 square feet (5 trays)
EXPANDABLE: Yes, maximum 12 trays
SHUT-OFF TIMER: No
ADD ONS: Sheets for drying liquids, Sheets for drying small items, Additional trays
BEST FOR: Those on a budget or who only want to dehydrate small to medium quantities
PRICE: $$
The Snackmaster Pro is another offering from Nesco that we think is good value. It is a good choice if you are new to dehydrating (and don’t want to invest a lot of money) or you only plan to dehydrate foods occasionally.
Of course the Snackmaster Pro has several key differences to its bigger sibling the Gardenmaster Digital Pro. First, it is a smaller unit. Although they both come with 5 trays included the Snackmaster trays are 13.5” in diameter while the Gardenmaster trays are 15.5” in diameter.
Second, the motor is less powerful. The Snackmaster’s motor is 600 watts compared with the Gardenmaster’s 1000 watts. This won’t make much difference for small to medium quantities, but it does mean that the Snackmaster is only expandable to 12 trays compared to the Gardenmasters maximum of 20 trays.
Third, the Snackmaster does not have a automatic timer. This means you have to shut the unit off manually. On the other hand the Gardenmaster comes with a digital timer so that you can set the unit to run for exactly as long as you need.
Note: The Snackmaster Pro is sold under two model codes, FD-75A and FD-75PR. There is no difference between the dehydrators sold under these model codes. The only difference is the packaging. Apparently the FD-75PR uses “frustration free packaging”. Ridiculous but true.
A “HOW TO” GUIDE FOR DEHYDRATING
Keen to dehydrate your own meals for your next backpacking trips?
Just follow these 7 easy steps…
1. BUY AN ELECTRIC DEHYDRATOR
If you don’t already have an electric food dehydrator, then you will need one. Don’t worry, they aren’t a big investment. You can get them pretty cheap.
If you’re not sure what to buy, then check out our list of the 3 best dehydrators above.
Once you have purchased an electric food dehydrator then you are ready to get started!
2. COOK A MEAL
Red lentil dahl on the Way!
We usually opt for cooking entire meals at home and then dehydrating them. The alternative is to dehydrate individual ingredients and then use them in your cooking on the trail.
We prefer cooking and dehydrating entire meals because it makes things simpler and faster when out on the trail. For instance, dealing with spices and creating flavours is much easier in a home kitchen rather than a camp kitchen.
So simply cook your desired meal at home as you normally would!
However, avoid meals or ingredients with high fat or oil contents. If you need to use oil for frying etc, then use it sparingly. Oils and fats do not evaporate during the dehydrating process. If the oil or fat content is too high then it will allow the food to turn rancid even after being dehydrated.
3. LINE THE DEHYDRATOR TRAYS
I just make my own tray liners using parchment paper (details below). But you can also buy silicone tray liners.
Once you have cooked the meal you will need to lay it out on the dehydrator trays. The exact procedure might depend slightly on the type of dehydrator you are using.
For most cooked meals — e.g. dahl, pasta sauce, etc — you will need to line your dehydrator trays so that the food does not drip through. However if you are dehydrating larger objects like raw fruit or vegetables then you may not need to line the trays at all.
It is possible to purchase dehydrator-specific silicon sheets that can be used to line the trays so you can easily dehydrate foods with a higher liquid content. These are usually sold separately, although some manufacturers such as Nesco might provide a couple of liners when you purchase your dehydrator. These liners are often referred to as “fruit roll up” sheets, although they are useful for drying many more foods than just fruit roll ups! If you buy them, be sure to buy the right size and shape for your dehydrator.
Alternatively, if you decide against buying silicon liners then you can use the following steps to make your own liner sheets using parchment paper…
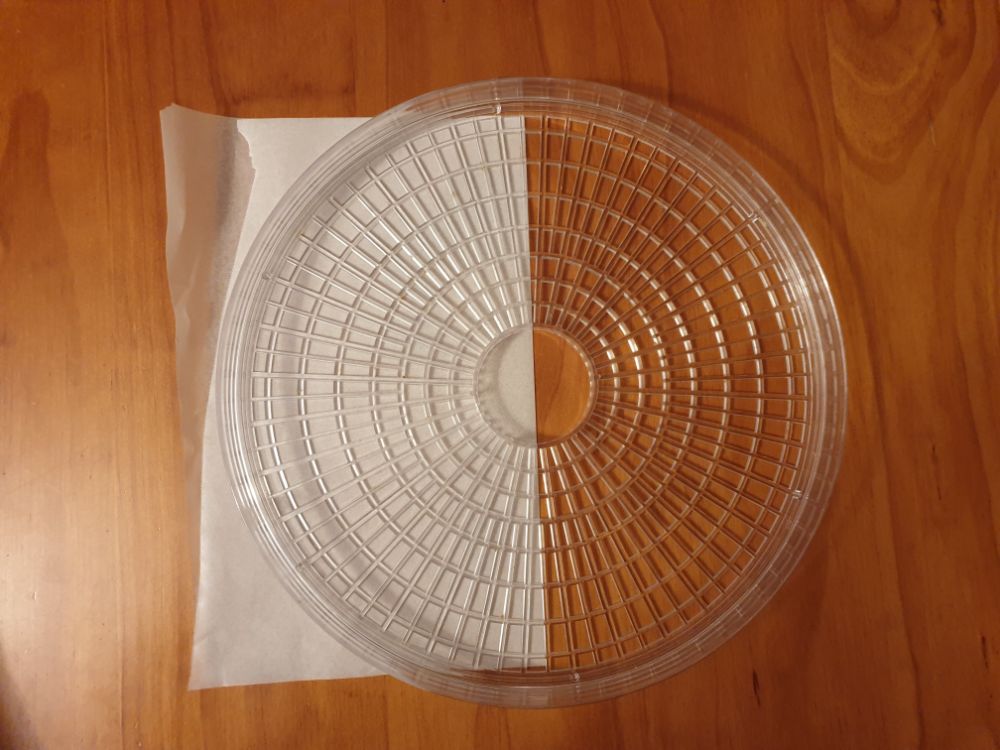
One slightly annoying feature of many stacked dehydrators is that their trays are often circular and have a hole in the middle that allows air to circulate once they are stacked. This means we have to “custom cut” parchment paper so that it fits the trays. To cut the parchment paper for our dehydrator trays I use the following method as it is more efficient than cutting each sheet separately (refer to the photo slideshow below for the method in action):
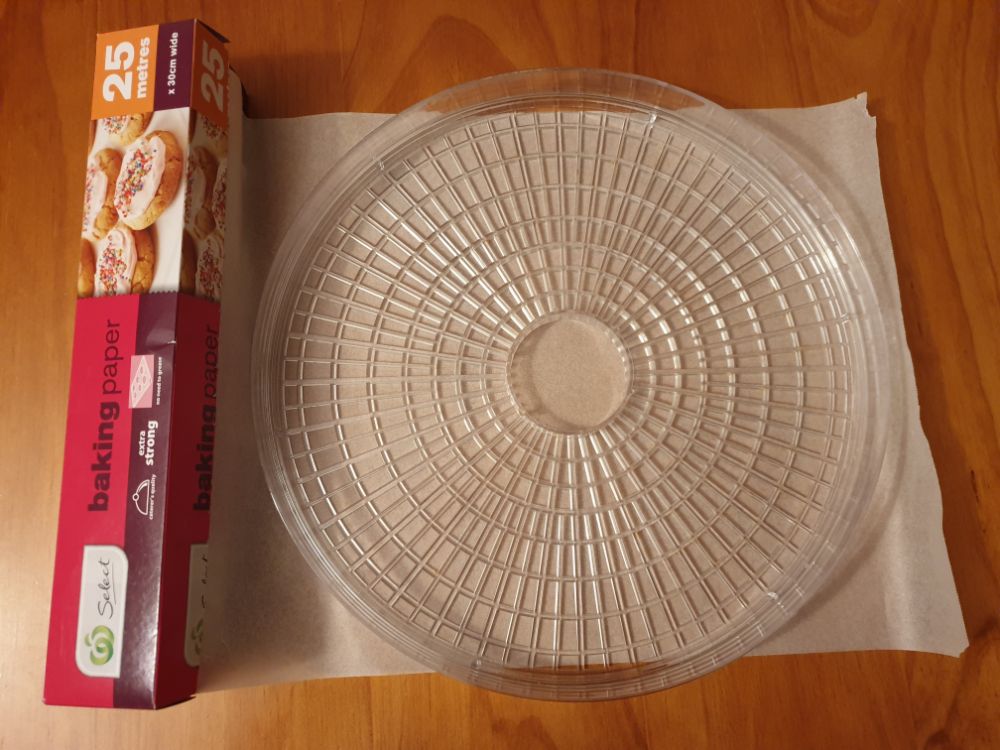


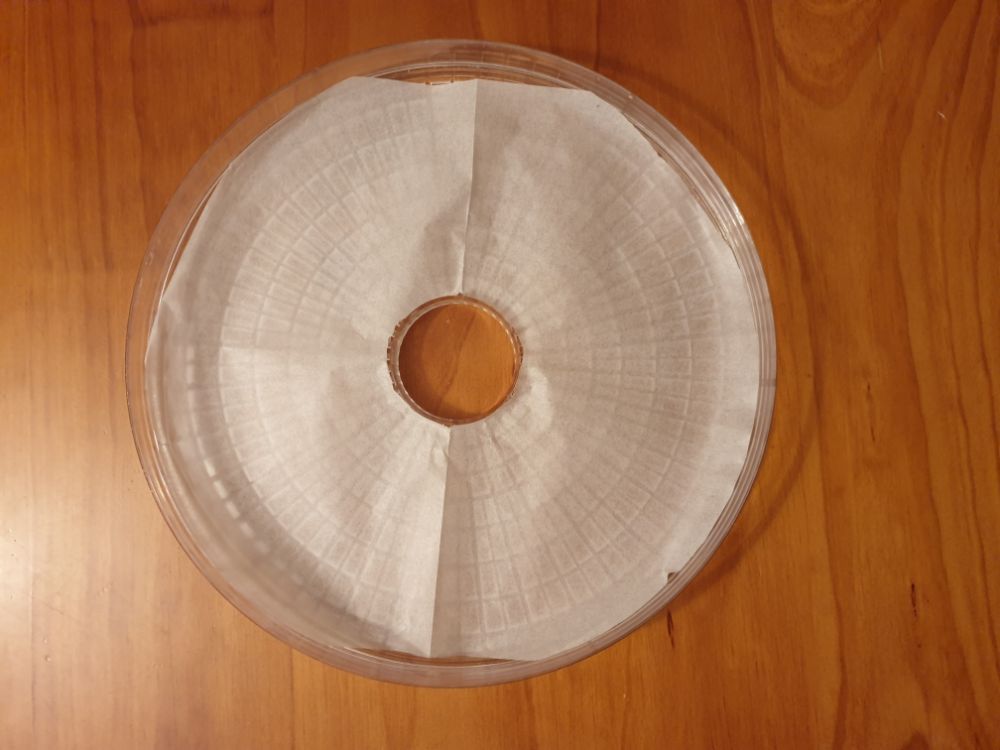
count the number of dehydrator trays you have — let’s assume we have 5 trays
cut 5 square sheets of parchment paper, each large enough to cover an entire dehydrator tray
stack the 5 sheets of parchment paper
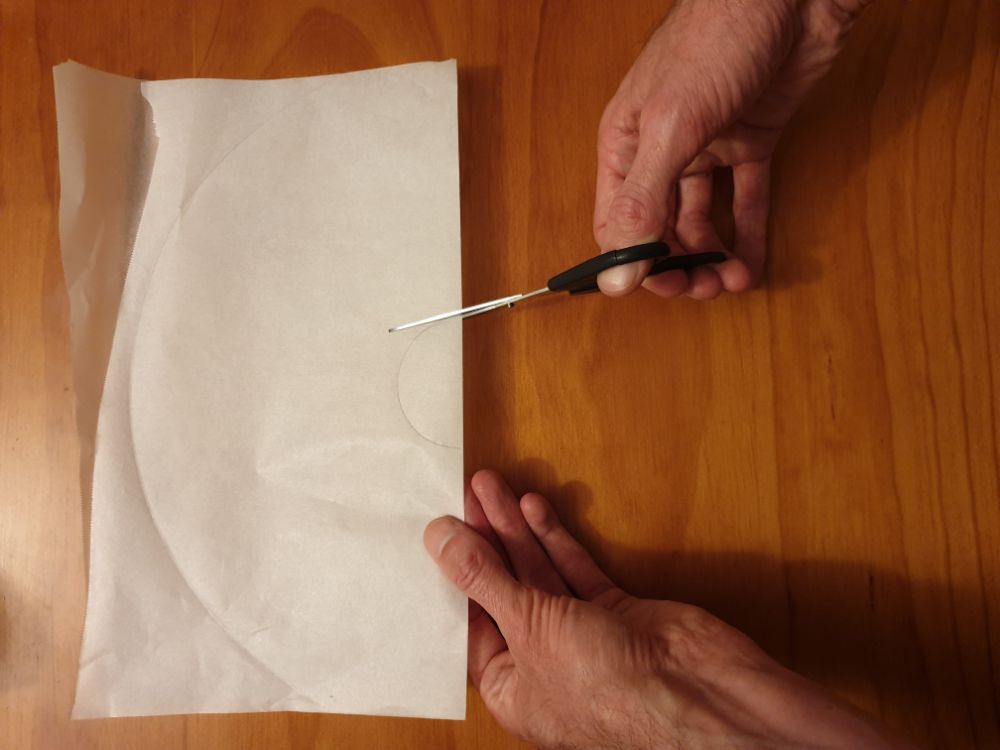
fold the stack of sheets in half
lay one of your dehydrator trays on top and use a pen or pencil to trace the shape of half the tray onto the parchment paper
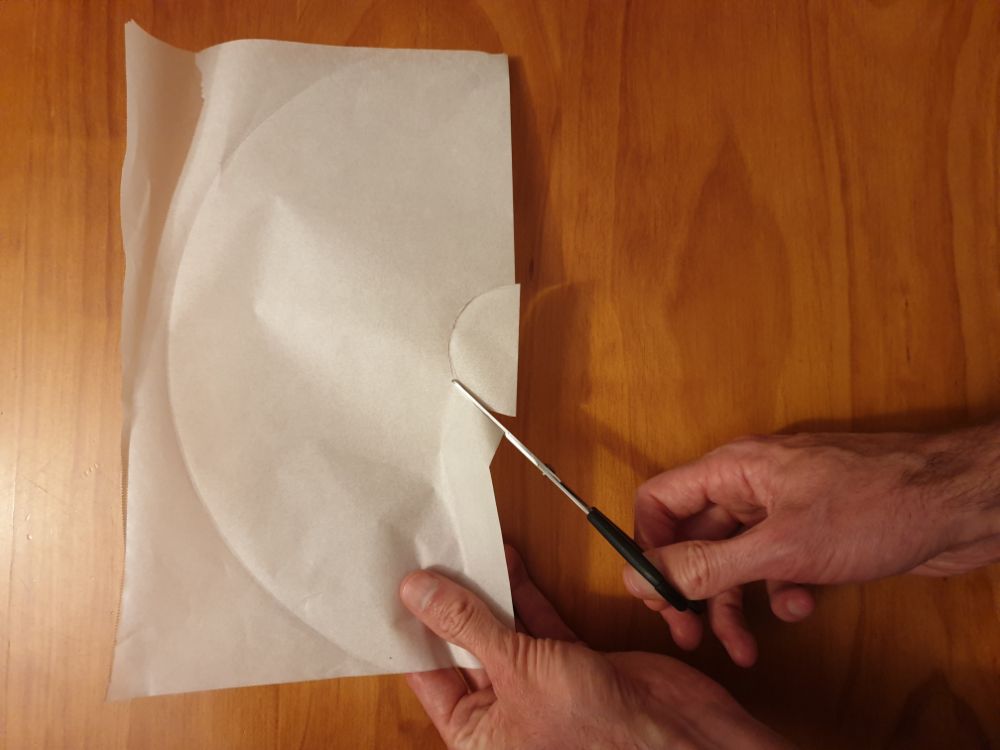
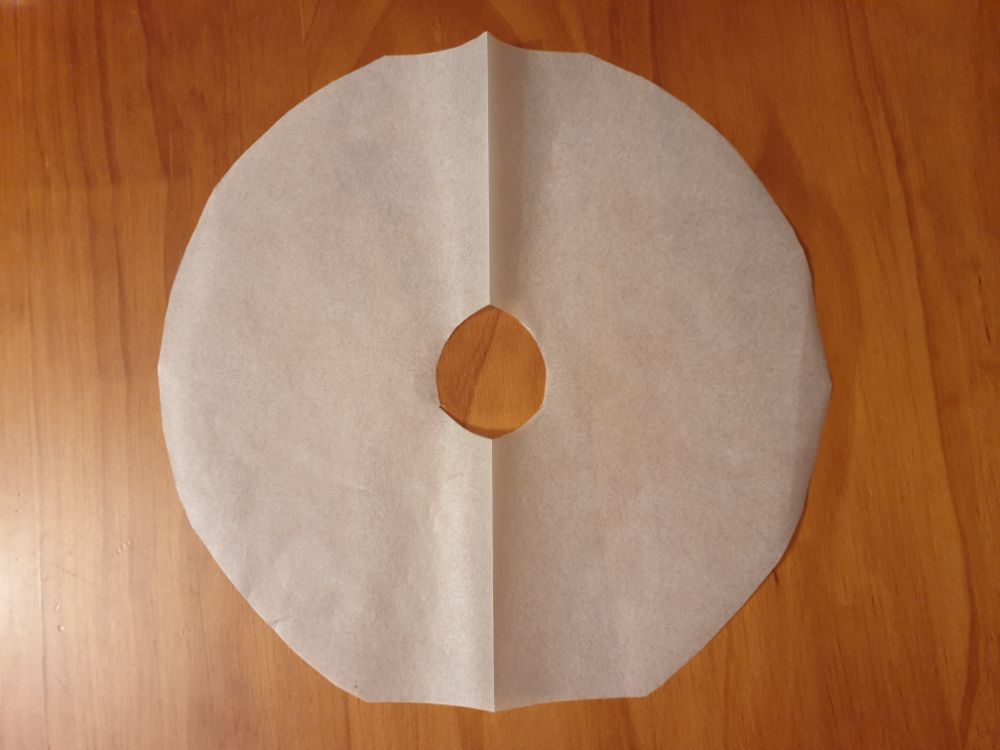
use scissors to cut the shape required for half the dehydrator tray and then unfold the parchment paper — this makes it easy to cut the central hole. Of course, if your dehydrator trays don’t have a central hole then you should just be able to cut the sheets of parchment paper without having to fold them!
4. DEHYDRATE THE MEAL
Lining the trays with the cooked dahl.
Lay the meal out on the parchment paper you have used to line the dehydrator trays. Use all the space and all the trays that are available. The thinner the layers, the easier the water content will evaporate.
Dehydrate the meal for as long as you need. For most cooked meals, dehydrating at around 110ºF (or 45ºC) should work reasonably well.
Just keep dehydrating until everything feels dry to the touch.
Don’t worry about making the food “too dry”. Too dry is better than not dry enough! If some of the trays are dry, but not others, then you can just remove the dry ones and keep dehydrating the others.
5. REMOVE FROM THE TRAY AND STORE IT
This is what the dahl looks like once dry (main photo) and stored (inset photo).
Once the meal is dry to the touch, remove it from the parchment paper and store it in a zip-lock bag.
For convenience later on, you can split it between several zip-lock bags so that you have the quantity for one meal in each bag.
If you made the tray liners yourself, then you probably don’t need to discard them (depending on the type of food you were drying). When you scrape the food off the parchment paper it generally leaves very little residue because of the lack of moisture. This means you can usually reuse the parchment paper liners several times.
6. RE-HYDRATE YOUR FOOD
Once it comes time to eat, re-hydrate the meal by simply adding water!
To do this, put the dehydrated meal in a pot. Then fill it with water just until the water line is covering the food.
Ideally you want to give the meal about 30 minutes to soak up water before you start heating it. Check on it regularly during that 30 minutes and add more water as needed.
Some dishes or ingredients need a little longer to soak than others. For instance, you might want to let rice or chickpeas soak for an hour. But you can always wait less time if you are in a hurry. Experiment with it and you will figure it out!
Note however that some dishes regain their original texture better than others. Our favourite dehydrated backpacking meal — red lentil dahl (see the recipe below) — is a real gem. When re-hydrated it is almost indistinguishable from when it was first cooked.
7. …OR DON’T RE-HYDRATE IT AT ALL
Re-hydrating is going to be necessary when you’ve dehydrated an entire cooked meal. However for individual fruits (and some vegetables) you might just want to eat them dry!
This is simpler and, better yet, dried fruit snacks are tasty! They also have a higher density of calories due to the reduced water content. So they are the perfect day snack to give you a healthy energy boost while on the trail!
OUR FAVOURITE RECIPES
Several of our favourite dehydrated backpacking meals are listed below. I don’t claim to be a master chef, so these recipes aren’t intended to be the work of a Michelin star restaurant. Instead they are relatively easy to prepare, dehydrate, and transport… and will still taste good when re-hydrated out on the trail.
Red Lentil Dahl
This red lentil dahl recipe is our staple for backpacking. It may well be the perfect dehydrated backpacking meal. It is cheap, easy to prepare, and easy to store.
Once dehydrated it basically becomes a flaky layer that you can crumble down to a powder. But after being re-hydrated and warmed up it is almost indistinguishable from when it was fresh in the stove-top pot!
We suggest pairing this one with the dehydrated basmati rice described below.
INGREDIENTS (makes 4 serves):
2 cups red lentils
1 Tbsp olive oil or coconut oil
1 brown onion
3 cloves of garlic
1 inch cube of fresh ginger
1 tsp black mustard seeds
1 tsp cumin seeds
4 tsp mild or hot curry powder
2 tsp ground turmeric
2 tsp ground paprika
1 canned tomatoes, approx. 14 oz (400 grams)
Approx. 6 cups (boiling) water
METHOD:
Place the red lentils in a sieve. Rinse them thoroughly with cold water, until the water runs clear. Place them to the side for later use.
Chop each of the brown onion, garlic, and ginger into small pieces.
Heat the oil in a saucepan.
Add the onion and fry for about 30 seconds.
Add the mustard and cumin seeds and continue frying for another few minutes.
Add the garlic, ginger, and remaining spices (i.e. curry powder, tumeric), and continue frying for a few minutes. You may need to add a few dashes of water to stop the spices from sticking or burning.
Add the lentils and cover with boiling water — once boiling, you can add the canned tomatoes and then bring back to a steady simmer. Continue simmering for about 30 or so minutes until the red lentils start to break down and the dahl thickens.
Once the dahl is finished cooking let it cool down for 30 minutes (it doesn’t need to cool down completely before being laid on the dehydrator trays, but it is better to wait until it isn’t still piping hot since thick dahl can really store some heat).
Line the dehydrator trays.
Lay the dahl out in thin layers on the liner trays, and dehydrate at approximately 110ºF (or 45ºC) for approximately 15 hours or as long as it takes until the dahl is crispy and flaky and feels completely dry to the touch.
Scrape the dehydrated dahl off the liner trays and place it in a zip-lock bag (or split the 4 serves between several zip-lock bags depending on your needs).
Vegetarian Tomato Pasta
Vegetarian tomato pasta is another one of our favourite dehydrated backpacking meals. Especially because the pasta provides a nice contrast to dahl & rice (our other favourite!).
The pasta sauce becomes somewhat like a dry leather after it has been dehydrated. In fact, it reduces so much in volume that when it is hard to believe it will feed you. But rest assured that when you add water to re-hydrate it, it will reappear as a thick and tasty tomato sauce with a few veges to add texture and interest.
Note that we only cook and dehydrate the tomato sauce and veges. The pasta itself can just be carried raw and cooked out on the trail.
INGREDIENTS (makes 4 serves):
1 Tbsp olive oil
2 medium brown onions
3 cloves garlic
2 large carrots
1 large bell pepper (red or green)
2 medium zucchinis
2 large jars of pasta sauce, approx. 35 to 50 oz (1.0 to 1.4 kg) in total
2 tsp ground paprika
Salt and pepper to taste
Optional: chilli to taste (we usually add a half tsp of chilli flakes)
METHOD:
Heat the oil in a saucepan (medium heat).
Add the onions and fry for about 1 minute.
Add the garlic and carrots and fry for a couple more minutes.
Add the bell pepper and zucchinis and fry until they start to soften a little.
Add the pasta sauce, ground paprika, salt, pepper, and chilli (optional) and heat through.
Line the dehydrator trays.
Lay the pasta sauce out in thin layers on the liner trays (no need to wait for it to cool down) and dehydrate at approximately 110ºF (or 45ºC) for approximately 15 hours or as long as it takes until the pasta sauce is leathery and feels dry to the touch.
Peel the dehydrated pasta sauce off the liner trays and place it in a zip-lock bag (or split the 4 serves between several zip-lock bags depending on your needs).
Basmati Rice
We usually have basmati rice with the red lentil dahl recipe described above, as well as with various other dehydrated curry dishes.
We prefer using basmati rice, but you could just as easily use standard long grain rice or any other type you prefer.
Cooking rice at home and then dehydrating it provides a couple of benefits. First, dehydrated rice weighs less than uncooked rice. Second, re-hydrating and warming the rice is much faster than having to cook it from scratch. This means you can carry less cooking fuel.
INGREDIENTS (makes 4 serves):
2 cups basmati (or long grain) rice
METHOD:
Cook the rice as per the packet instructions.
After the rice is cooked, drain it using a sieve, and then rinse it with boiling water.
Line the dehydrator trays.
Lay the rice out in thin layers on the liner trays, and dehydrate at approximately 110ºF (or 45ºC) for approximately 10 hours, or as long as it takes until the rice is crispy and feels completely dry to the touch.
Scrape the dehydrated rice off the liner trays and place it in a zip-lock bag (or split the 4 serves between several zip-lock bags depending on your needs).
SUMMARY
Dehydrated backpacking meals are a fantastic alternative to the processed & packaged freeze dried backpacking meals that are commonly seen in outdoor stores and on the trail.
The weight savings you achieve by dehydrating food are significant and not far behind the weight savings achieved by freeze drying.
An additional benefit of dehydrating is volume reduction. The dehydrating process reduces the volume of the food, thereby having it take up less space in your pack!
But the best thing about dehydrated backpacking food is that it is easy to prepare at home. This makes it cheaper, tastier, and healthier — making meal times out on the trail a far more rewarding experience!
MORE INFORMATION
For more tips on multi-day backpacking see other articles in our Backpacking 101 series:
Or if you are looking for more information on hiking and backpacking, be sure to check out some of our other tips and gear reviews:
Or check out our entire Gear Reviews Page, our Knowledge Base Articles, or Destination Guides for more hiking, backpacking, and outdoors related content.
Whatever you decide, happy hiking and take care out there in the wild!

Keen To Browse More Outdoor Kit?
Check out our Gear Reviews overview page, or focus in on one of these gear review sections:
Ready To Start Building Your Dream Kit List?
In our Gear Lists section we provide a list of best-in-class items for specific outdoor adventures. Get inspired by checking out our:
Gagging To Get To The Outdoors?
Find a jaw-dropping location for your next wilderness adventure by checking out our epic Destination Guides! How about: